The other day I received a message asking how to send out a PDF from a Facebook page sign up form. I briefly described how to do it and everybody went happily on their way.
Beyond this though, what should you actually be doing, I will go through a quick step by step guide on how to set a lead magnet up using Facebook and Mailchimp.
First up, this isn’t just for small start-ups, but businesses of all sizes could benefit from this type of activity, if you have something that you could send out digitally, you can gather leads via your Facebook page with an embedded form, the main thing that it needs to do, is add value to the recipient.
I will make a couple of assumptions at this point, first, you have a Facebook page set up and second that you have a Mailchimp account set up too.
Step 1 – Create your give away content
As I said above, this can be anything that can be sent out digitally and adds value to the receiver.
Step 2 – Connect your Facebook page with your Mailchimp account
This can be found under the account menu on the drop-down on the top right of the Mailchimp screen.

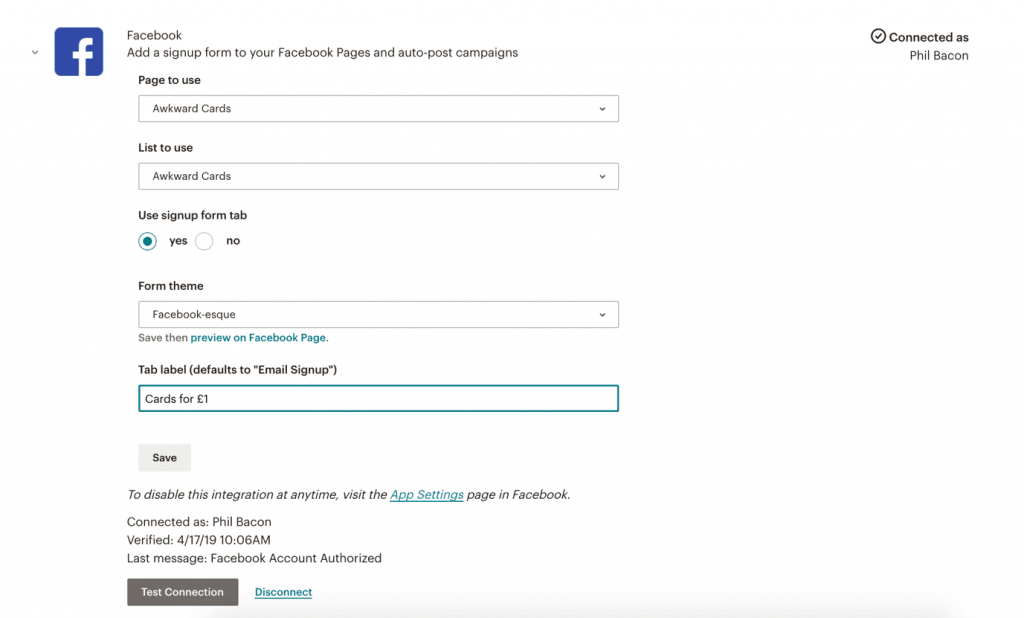
- Once you are logged in to Facebook via Mailchimp, it is pretty straight forward to add a form to your page.
Select your page from the drop down and the list to use - Select the radio button to Use signup form tab
This will automatically add a form on a tab on your Facebook page, styling can be either list or facebook-esque and then name the tab (hint! Make it something enticing and hit save)

Once you have saved it, click the preview on Facebook button to make sure you are happy with it and we can move on to the next stage.
The next stage is contacting your subscribers who have come through Facebook with the information that they have requested. As the list may have multiple feeds in to it we need to be able to identify people who come in via Facebook. I will show you how to do this shortly.
Step 1 – Create an email campaign
This will need to be an automated campaign, so switch to this on the top menu and select Welcome new subscribers as the focus for this campaign. With this example we will only be sending one email, but you can add more to it and we will use the welcome message automation as the template structure.
Step 2 – Change the trigger
Click edit and change this to immediately, this will deliver the content straight away, probably even before they have moved off your Facebook page.
Step 3 – Change the filter
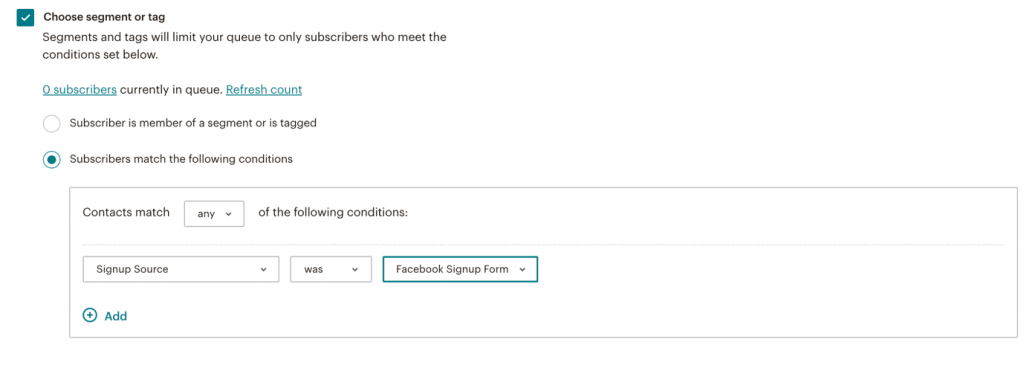
Here you can filter out people who land on your list for other reasons, click edit and then check the choose segment box, from here change the options to be subscribers match the following conditions and these should be “Signup Source” was “Facebook Signup Form” and click save segment. (This can be used to filter any segment out of your data as long as you know who you are looking for or what group you are looking for).

Step 4 – Create your email and include the location of your download on a download button.
Step 5 – Click next and then Start sending
Great your automation for delivering content is done. Time to work on the next one.
Optional Step 6 – Post send action
Once the audience member has received the download, you might want to easily identify them for a specific download, if this is the case you can add a tag to them by going in to the edit menu for Post Send actions and selecting ‘Add Tag’. To do this, the tag will need to have been created on the list already, which can be done from the list view under audience, then manage contacts. This can then be used for future targeting.
Optional Step 7 – Follow up email
Optional (and advisable) follow up the first email with a secondary thank you / ask a question to try to engage your new audience.


